
Did You Know?
Managing student attendance is a crucial aspect of educational administration. It ensures that students are present and engaged, which is essential for their academic success. An effective attendance management system helps to monitor student presence, identify patterns of absenteeism, and implement timely interventions. This process involves recording, tracking, and analysing attendance data, and can range from traditional manual methods to advanced automated systems. The goal is to maintain accurate records that support student accountability and enhance overall educational outcomes.
The Student Attendance Management Process at ALLEN Career Institute Pvt. Ltd. is designed to ensure systematic tracking and monitoring of student attendance to promote academic success and personal development.
By implementing the comprehensive attendance management process, ALLEN aims to create a supportive learning environment where students are motivated to attend classes regularly and achieve their academic goals.
Counselors play a crucial role in supporting students’ attendance and addressing related issues. They meticulously monitor attendance records to detect patterns of chronic absenteeism or irregular attendance, enabling early intervention. Additionally, counselors collaborate with administrators, students, and parents to develop effective strategies, leveraging diverse perspectives to address underlying causes of absenteeism.
Following administration directives, counselors reach out to students and parents promptly to understand factors contributing to absenteeism, enabling proactive intervention.
It is important to note that the specific role of a counselor in addressing attendance may vary depending on the situation or necessity. However, their overall goal is to support students in achieving regular attendance and academic success.
The Student Attendance Management System provides a comprehensive solution designed to efficiently manage student attendance and related tasks. This software encompasses a variety of processes and options, each serving a specific purpose. However, for counselors, only two tabs are essential:
These tabs are particularly useful for counselors as they facilitate easy access to necessary tools and functionalities for managing student attendance effectively.
Here’s the visual representation of the Student Attendance Management System showcases the various processes and options available within the panel.

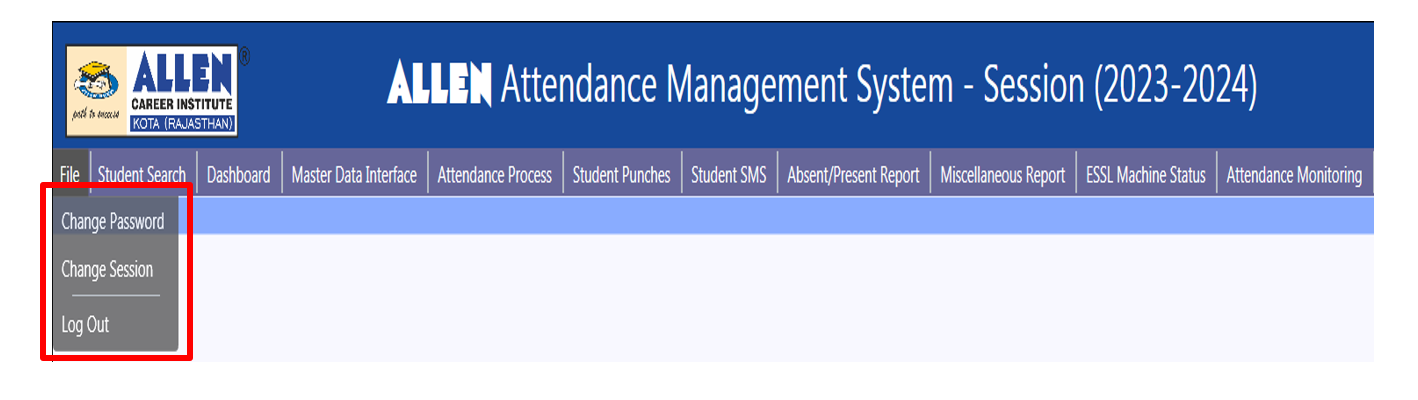
2.1 File
The File menu provides three options:
2.1.1 Change Password: This option enables the counselor to update their password for added security and personalization within the system.
2.1.2 Change Session: This feature allows the counselor to switch between academic sessions to access student attendance records for different periods. For instance, if a student has enrolled at ALLEN for multiple academic years, the counselor can select the relevant session to view attendance data for that specific period. This functionality aids counselors in effectively monitoring attendance across various academic sessions
2.1.3 Logout: This option permits the counselor to securely exit the system, ensuring the confidentiality of student data and maintaining privacy.
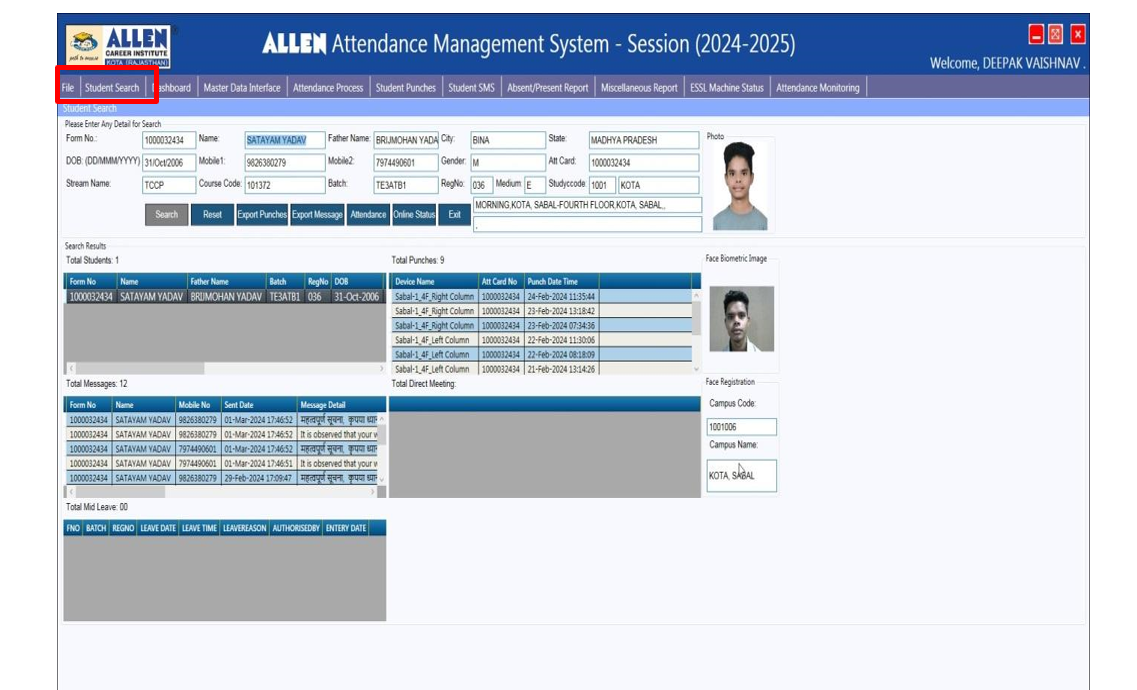
Upon clicking on the Student Search tab, you can obtain comprehensive details about a particular student by entering various search criteria. These criteria include form number, name, father’s name, city, state, date of birth, mobile numbers, gender, attendance card details, stream name, course code, batch, registration number, medium, and study code. This allows for precise retrieval of information regarding specific students based on different identifiers and attributes.
The details provided include:
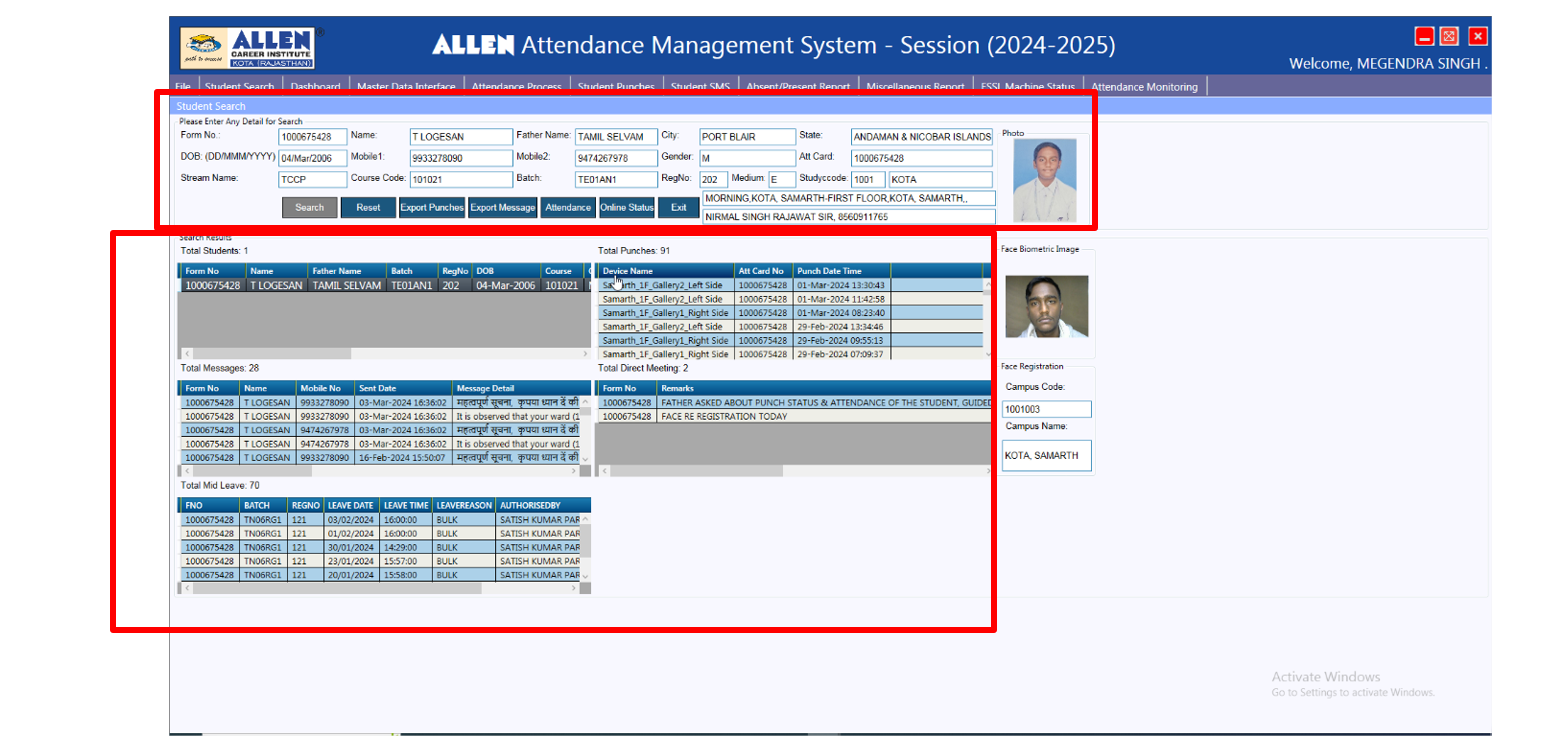
A. Campus Code: Represents the code of the campus where the photo was captured, and its template is stored.
B. Campus Name: Represents the name of the campus where the photo was captured, and its template is stored.
It’s essential for those involved in attendance monitoring to ensure that the assigned class location matches the building where the photo was captured or stored. Attendance will only be marked if this match occurs; otherwise, the student will be considered absent. It is necessary to address and resolve any discrepancies faced by students.

4. Total Punch:This section provides a detailed summary of every instance where a student has scanned his face for attendance. It records the date, time, and location (building) of each scan. This data enables precise monitoring of student attendance across different classes or activities.
5. Total Messages: This section is responsible for managing situations where a student is absent from class without notification or forgets to scan their face for attendance. In such cases, the system generates SMS notifications, which are sent to the registered mobile numbers of the student’s parents. These messages are transmitted in both Hindi and English to ensure effective communication.
6. Total Direct Meetings: This section documents instances where students and parents visit the attendance monitoring cell to address issues related to face scanning, leaves, or attendance in general. This section records the total number of direct meetings, along with the form number and remarks based on discussions held during these face-to-face interactions. It serves as a log of the interactions between students, parents, and the attendance monitoring cell regarding attendance-related matters.
7. Total Mid Leave: In situations where a student needs to leave the class before its completion, scanning the face at the exit gate is mandatory. Failure to do so will result in restricted departure from the ALLEN premises. Additionally, the system automatically sends SMS notifications to the parents’ registered mobile numbers, informing them about the student’s mid-leave.
The Total Mid Leave section provides an overview of all mid-leave instances. It includes details such as the total number of mid-leave instances, form number, batch, registration number, leave date, leave time, leave reason, and the name of the authorized person. This functionality also tracks the total number of mid-leave instances for each student.
8. Total Students: This section shows the total number of students matching the specified search criteria along with their respective details.
9. Reset: This feature allows users to quickly clear search fields, enabling them to conduct another search for a different student.
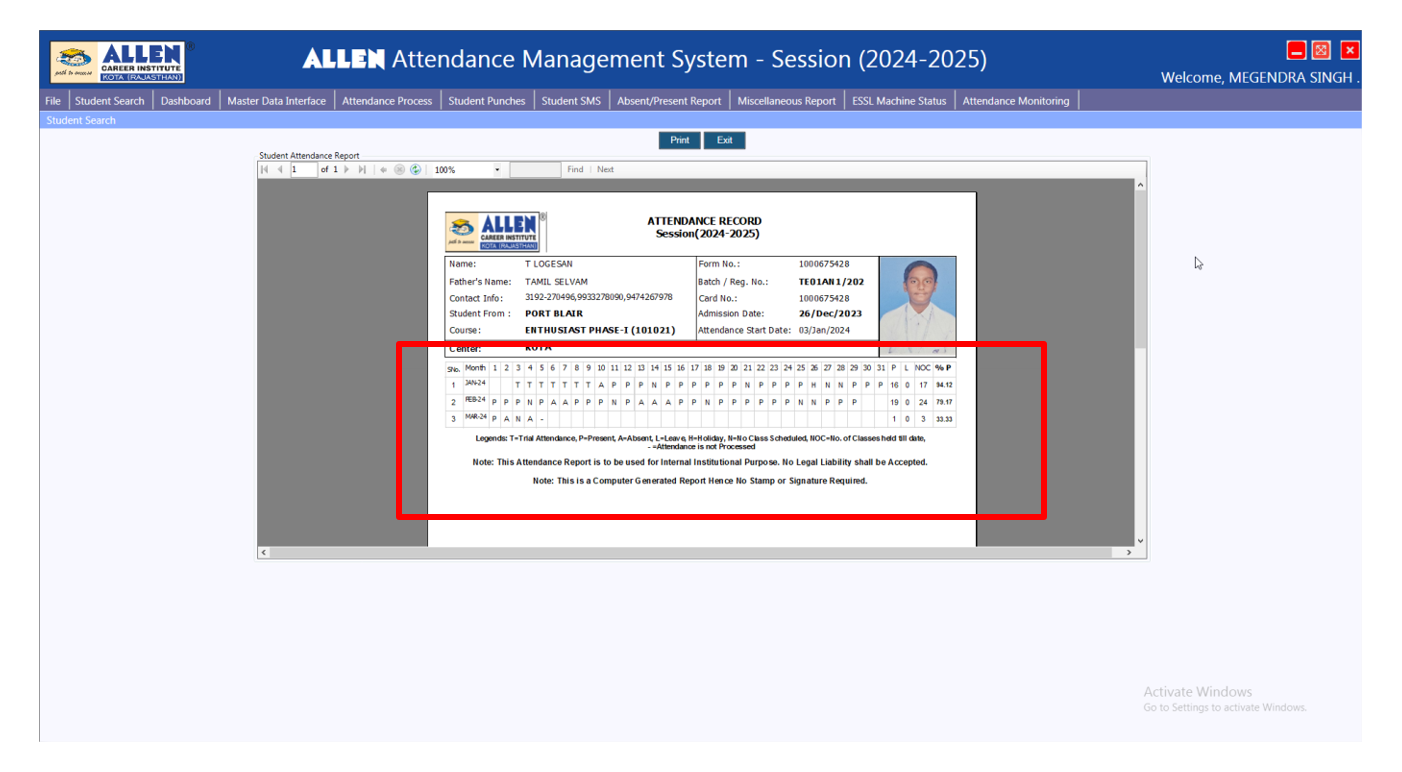
10. Attendance: Clicking this button grants the user access to a detailed attendance sheet for a specific student. In the monthly attendance sheet for the session 2024-25, the initial 7 days are considered a trial period. During this time, whether the student is present or absent, the attendance will be marked with an initial of “T” in the attendance sheet. After this trial period, the actual attendance status (present, absent, holiday, no class, leave) is recorded, along with the total number of classes attended. Additionally, it displays the month-wise percentage of classes attended, providing a comprehensive overview of the student’s attendance history.
11. Online Status:This feature provides the user with the ability to monitor the real-time status of a student’s leave application, submitted via the ALLEN digital website/mobile app. The sheet offers comprehensive information, including the student’s form number, parents’ names, type of leave, status, leave process status, duration of leave, Samvad status update date and time stamps, status username, entry date & time, and remarks. Additionally, there is an option to export the sheet for further reference or analysis.

12. Exit: This option is used to exit the Student Attendance Management System.
Note:
The admins hold the responsibility of monitoring and managing student attendance in the institution, facilitated by an attendance management tool. They ensure students attend classes regularly and take appropriate action when attendance issues arise. Additionally, they implement diverse strategies to enhance attendance rates and tackle chronic absenteeism.
Furthermore, if there is a need, they connect students and parents with relevant resources and services, such as social workers or mental health professionals, to address attendance issues effectively.
a. Monitoring and Record-keeping:
Admin is responsible for monitoring student attendance and maintaining accurate records, including attendance data recording, report generation, and ensuring compliance with legal requirements regarding record-keeping.
Maintaining comprehensive and detailed attendance reports for each student using the Attendance Management System Software is a critical aspect of admin responsibilities. These reports should encompass absent messages, scan details, mid-leave messages, attendance monitoring cell meetings, and leave application status. The accuracy and comprehensiveness of these reports are pivotal for our record-keeping and analytical processes.
b. Investigation of Absences:
Admin investigates student absences to determine the reasons behind them. This process may involve contacting parents or guardians to gather information and ensure compliance with attendance policies.
c. Addressing Chronic Absenteeism:
In cases of chronic absenteeism or truancy, admin appropriately addresses the issue by working with students, parents, and school staff to develop intervention plans, referring cases to attendance panels if necessary, or collaborating with external agencies to provide support and resources.
d. Enforcement of Attendance Policies:
Admin ensures compliance with attendance policies and regulations by implementing strategies to reduce absenteeism, including promoting regular attendance and addressing attendance barriers.
e. Attendance Report Preparation:
Admin prepares and provides attendance reports to faculties and other relevant personnel, which may include information about individual student attendance and its patterns as needed.
f. Addressing Concerns Promptly:
Addressing attendance-related concerns raised by parents and students promptly is integral to the admin’s role, often involving collaboration with attendance monitoring cells in specified buildings for further intervention:
g. Mid Leave Protocol:
Ensuring that students do not leave the class in mid without appropriately scanning their barcodes and photo ID (Face Recognition) is a critical responsibility. In the event of an unauthorized mid leave, it is essential to notify parents via SMS messages and meticulously record the details in the provided panel.
h. Continuous Absence Notification:
For students who are continuously absent for three days without prior notification, it is the admin’s responsibility to take proactive action by assigning outbound robocalls to the concerned team, commencing from the first day and continuing for the next two days. Following the third day of continuous absence, both robocalls and manual calls should be made to parents to confirm the student’s status. Using the C-Zentrix software, the objective is to inform parents about their child’s prolonged absence. It is crucial to document all conversations for subsequent reference and follow-up.
Students who have newly enrolled at ALLEN will receive robocalls even if they have taken a 1-day leave.
i. SMS Notifications:
Sending SMS notifications the next day in both Hindi and English to parents of absent students is a routine practice. These notifications serve to inform parents in cases where students are absent without prior intimation, forget to scan their faces, or encounter difficulties scanning for any reason.
Note: For the PNCF and Commerce streams, In-Out punch SMS messages are sent on the same day to parents to inform them about their child’s current status. This practice does not apply to other streams.
j. Regular Monitoring of Attendance System:
Regular and vigilant monitoring of the Attendance Monitoring System is essential to ensure its accuracy and functionality. It is essential to acknowledge that parents access their children’s attendance information through the student zone of the system. Immediate action should be taken in cases where issues or discrepancies are identified.
k. Monitoring Study Drop Requests:
If a student has applied to drop studies and has been absent from the institute since then, calls must persist under the guidance of admin until we receive confirmation from parents regarding the student’s study drop.
The Student Attendance Management System provides a comprehensive solution designed to efficiently manage student attendance and related tasks. This software encompasses a variety of processes and options, each serving a specific purpose.
Let’s understand the various processes and options available within the panel:
4.1. File & Users Log details:
Primarily, Counsellors are responsible for tasks related to File and Student Search. Detailed explanations for these tabs and the tasks associated with them are provided within that section. Administrators can access these tabs to gather information if needed.
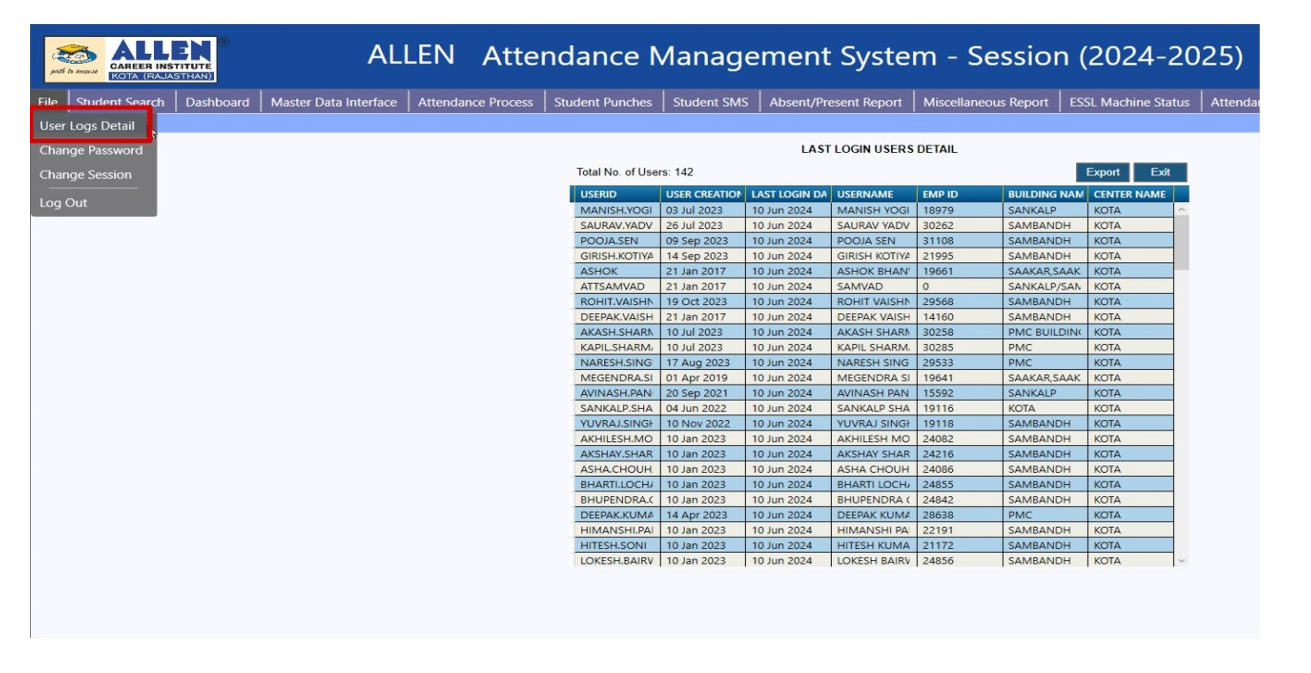
4.2. Student Search
Currently, we can check Kota based attendance system users details.
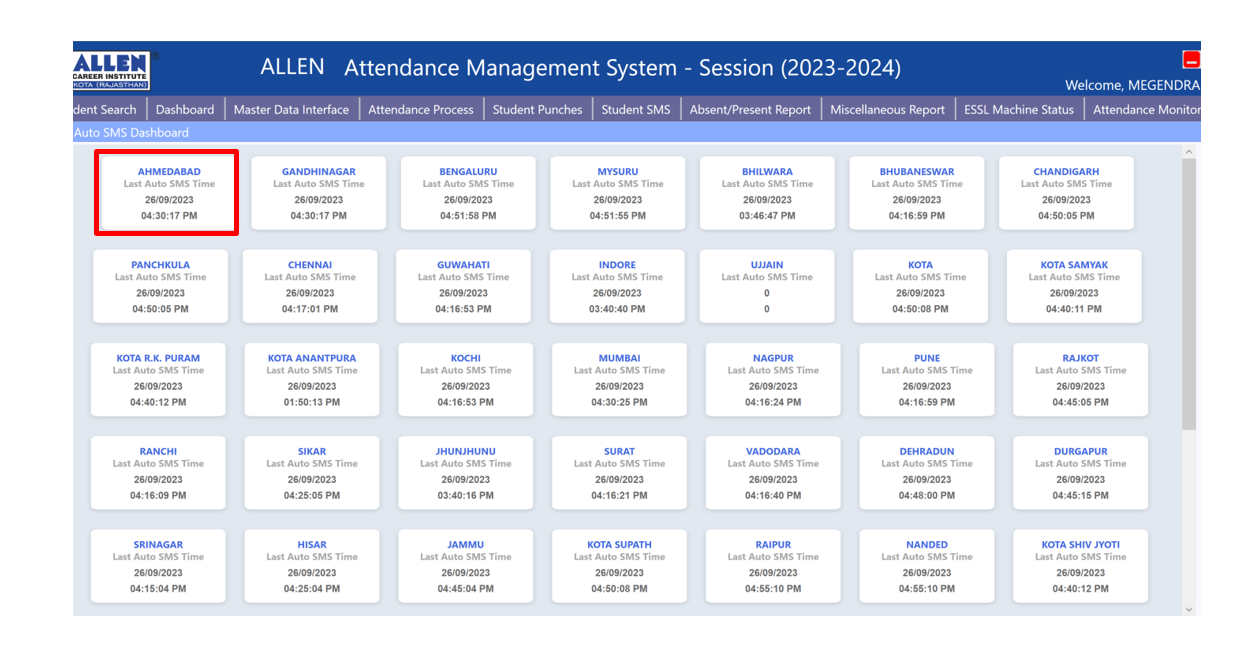
4.3. Dashboard
Navigate to the Dashboard tab and choose “Last Sent Auto SMS Dashboard” from the drop-down menu. This dashboard presents details about the most recent automated SMS sent to parents from all ALLEN centers, including the center’s name, date, and transmission timestamp. This information ensures that attendance recording machines in all centers effectively capture attendance.

 4.4. Master Data Interface
The Master Data Interface tab functions as a platform for modifying various components, such as class schedules, batch times, leaves, course commencement and end dates, and other relevant information. Upon selecting this option, a drop-down list will appear, offering several choices for updating and maintaining different datasets. Among the available options are:


By default, the end date for all courses is set as March 31st. In cases where a course concludes before this default date, the academic team provides the relevant information, an subsequently, the IT team is authorized to make the necessary adjustments and update the course end date accordingly.
Next, you can select the start and end dates for the batches. The schedule is organized from Monday to Saturday on the left side, with Sunday listed as a day off on the right side. Once the changes have been made, save them. The updated information will then be presented in a list format.
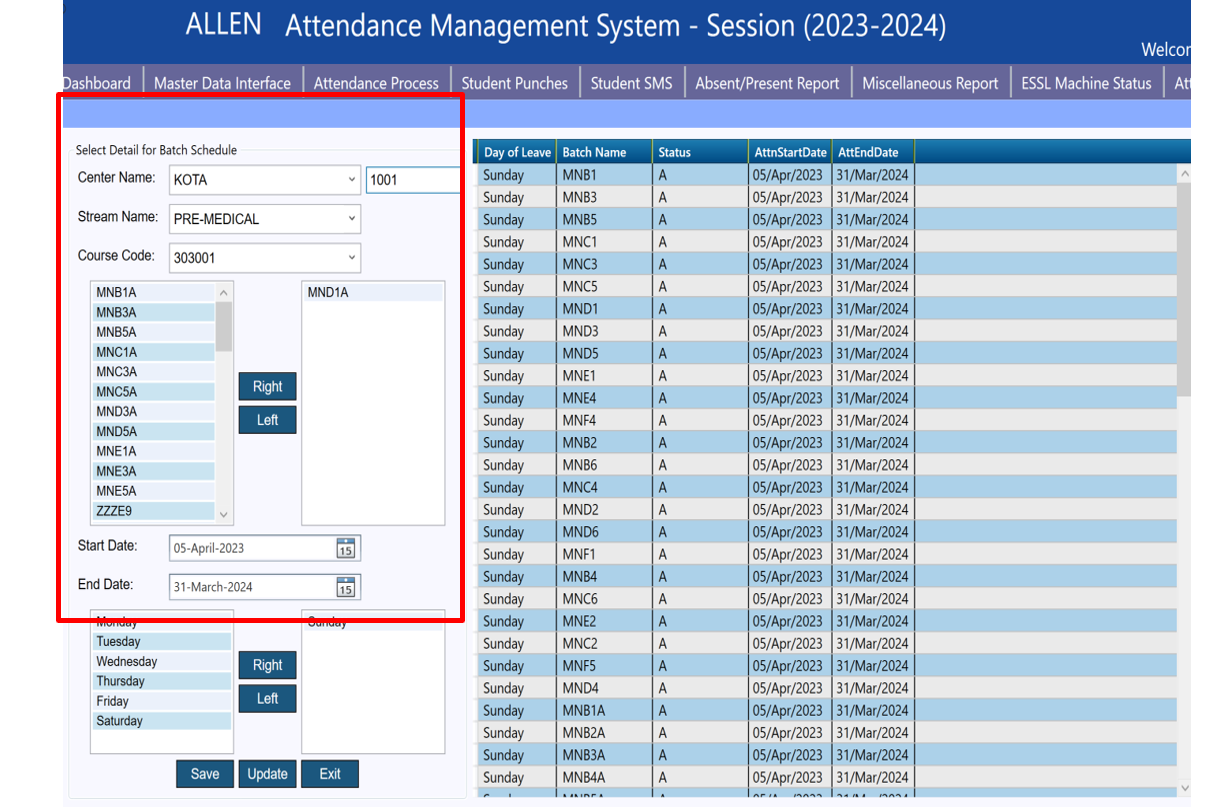
By default, the end date for all batches is set as March 31st. However, in cases where a batch concludes before this default date, the academic team provides the necessary information. This empowers the IT team to make the required modifications and update the batch end date accordingly.

The list view will present information such as the holiday’s status (active or cancelled), center code, course, remarks, and close date.

To update a student’s local address, select the “Update Student Local Address” option. The form will display pre-filled details such as Form Number, Name, Father Name, Batch, Stream, Course Centre Name, Permanent Address, Mobile Number 1, 2, and Student Mobile Number. Additionally, specific details of the local address, including hostel/building name, house number, area name, landmark, status, and remarks, will be presented. If the address has been previously updated and requires further modification, it can be edited and updated accordingly.

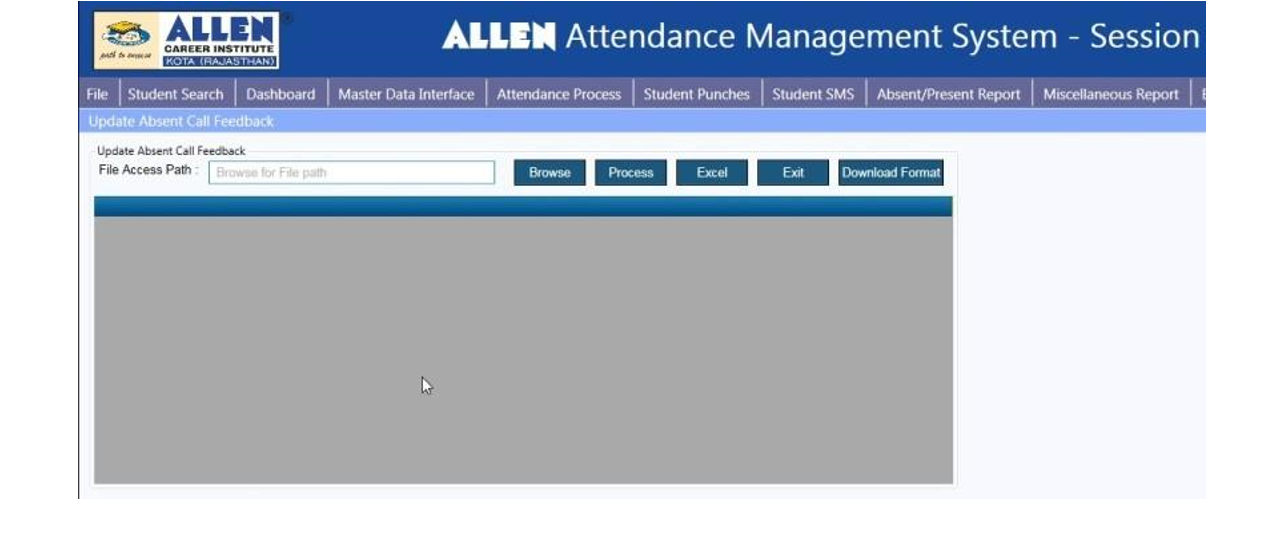
By selecting the “Update Absent Call Feedback” option, you can primarily upload the feedback report in CSE format, which is a built-in structure. Additionally, various functions such as file access path, process, excel, exit, and download format are available. These functions enable browsing, processing, converting to Excel, closing, and downloading the updated feedback report.
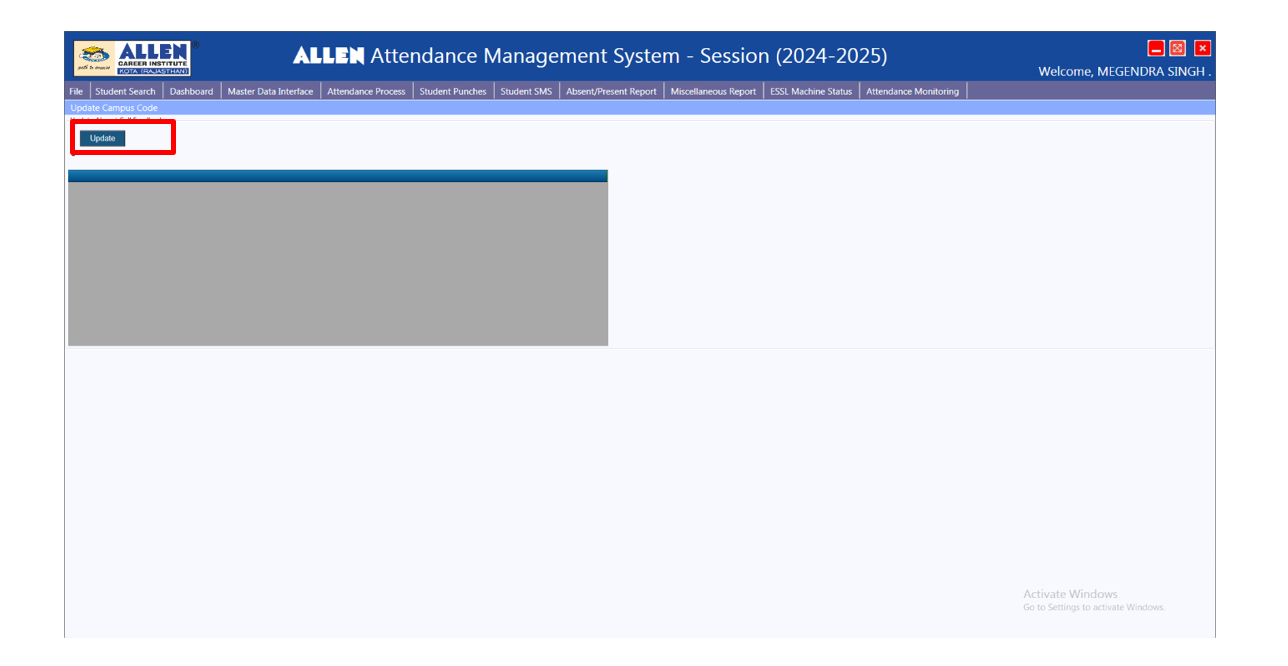
4.5. Attendance Process
The attendance process involves collecting daily attendance data for students. This includes verifying if students are attending classes regularly, ensuring the proper functioning of scanning machines, and monitoring whether students are correctly scanning their faces. In cases where a student’s attendance is not recorded despite correctly using the scanning machine, it may be due to a network failure. In such cases, an option is available to search for the missing attendance data.
The attendance process includes several options that facilitate the completion of the attendance process. These options are:
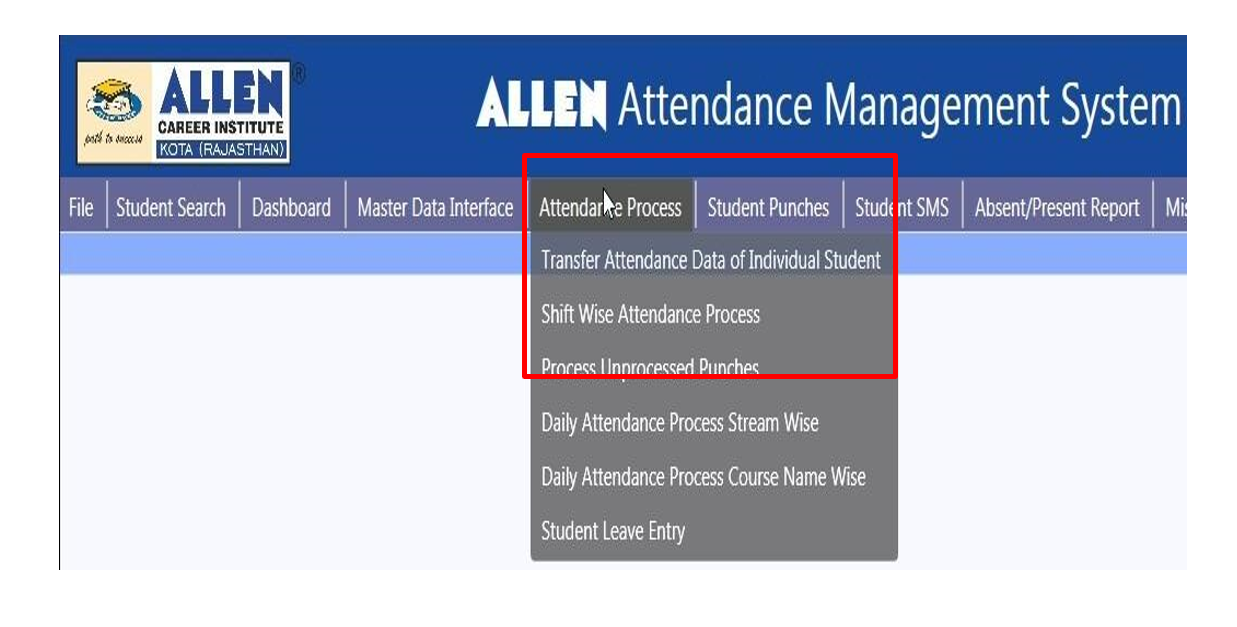
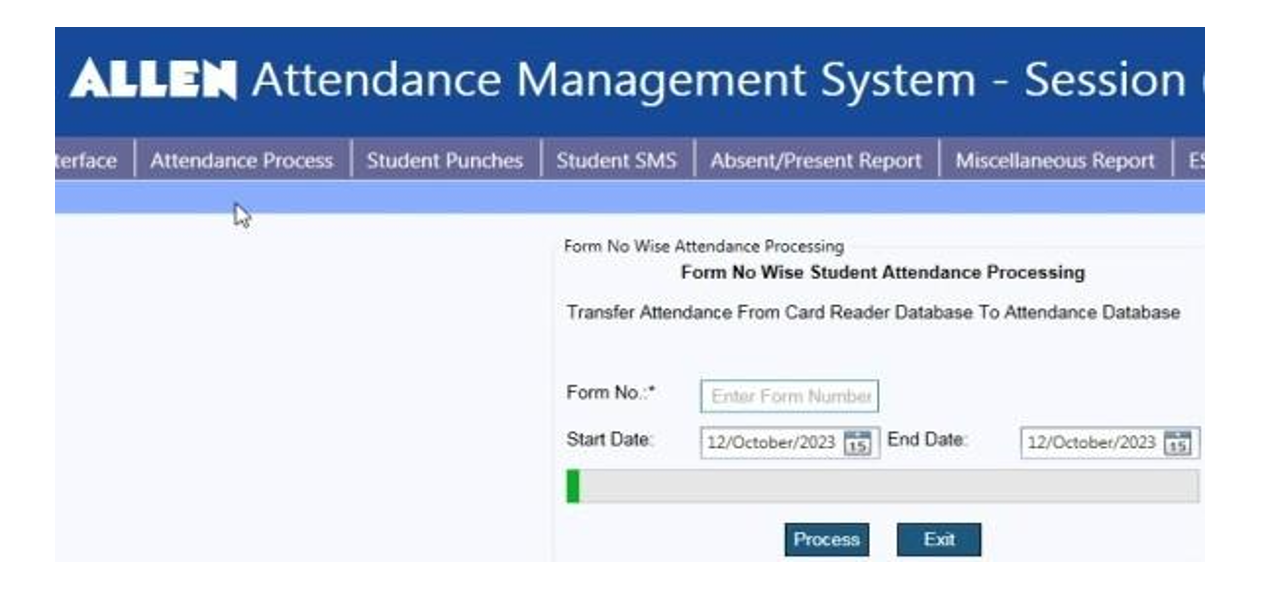
To retrieve the attendance data for the specific student, follow this process:
4. Shift Wise Attendance Process: The shift-wise attendance process is used in situations where there are issues with downloading the attendance data for either the morning or evening shift of a particular batch. These issues may arise due to missed downloads or network downtimes during the shift.
Here is how the process works:

This option facilitates the transfer or conversion of the previous day’s attendance data from the Face Reader Database to the Attendance Database, enabling the retrieval of the missing data. It specifically addresses data that is one day old.
Here’s how the process works:

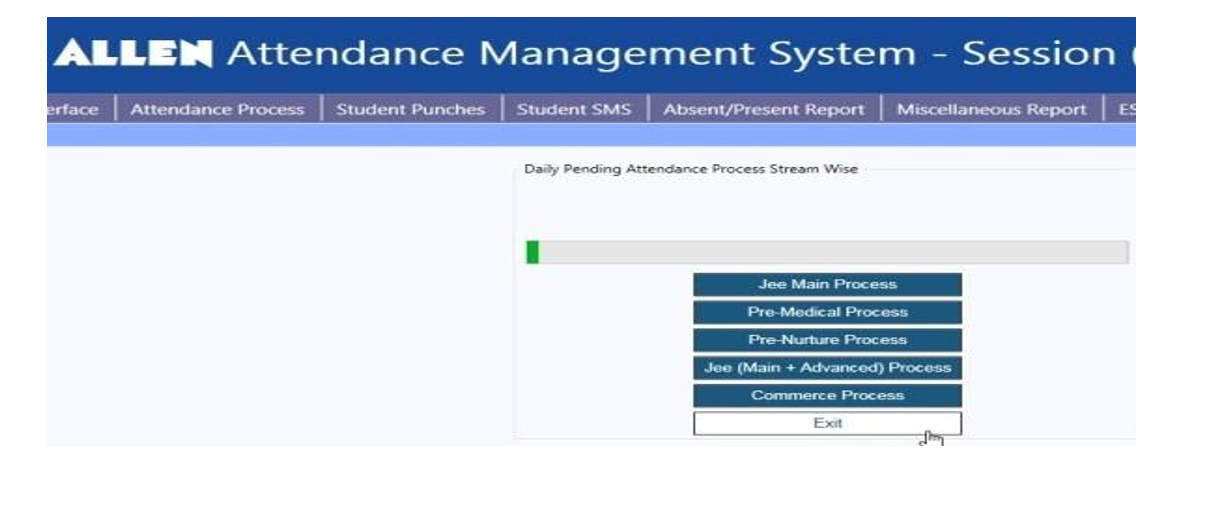
Here is how the process works:
By following these steps, you can successfully retrieve the attendance data for the specific stream.
Follow these steps to download and transfer attendance data:
By following these steps, you can ensure accurate downloading and transferring of attendance data for the specific course, resolving any issues with missing or incomplete data.
 4.6. Student Punches
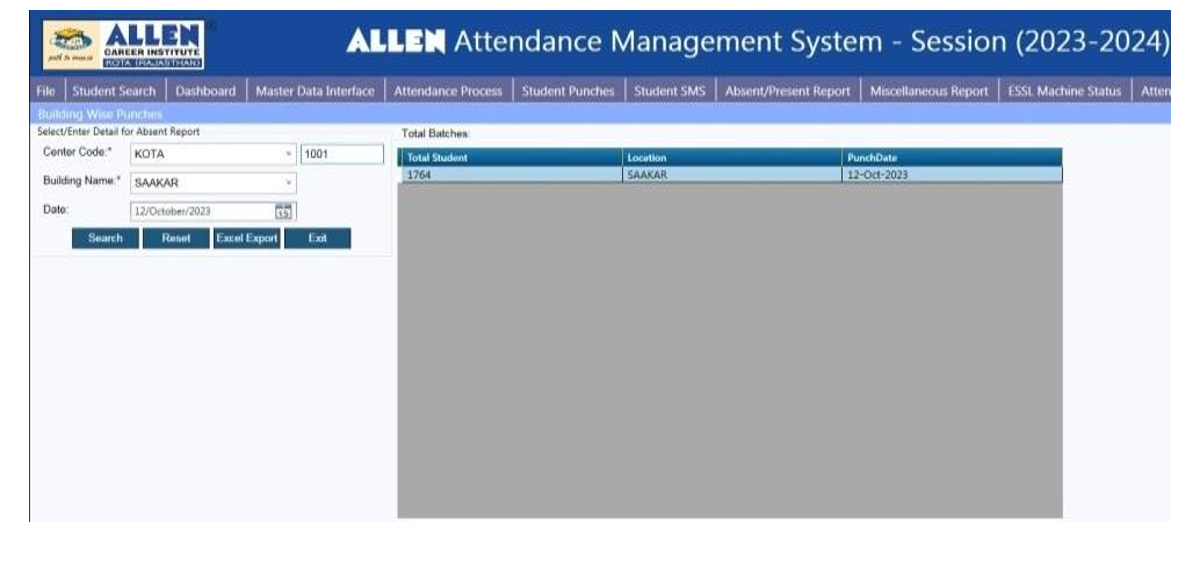
This tab provides admins with the ability to download detailed reports on students’ regular face scans. Face recognition machines are installed outside every classroom on every floor of each building. This feature also ensures the proper operation of all face-scanning devices. The report includes the total number of student scans for each building. The Attendance Records feature offers a range of reporting options, including:

To download the Building Wise Punches report:
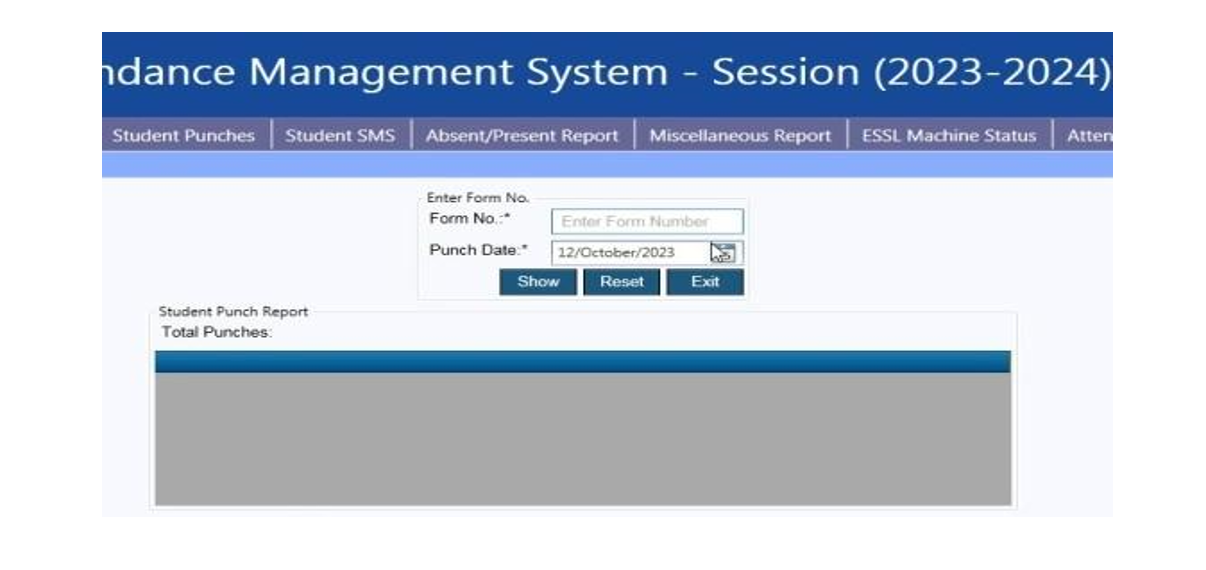
This option allows users to retrieve a detailed report showing the total number of scans recorded for a specific student on a particular date.
To download the Punch Date Time Report:
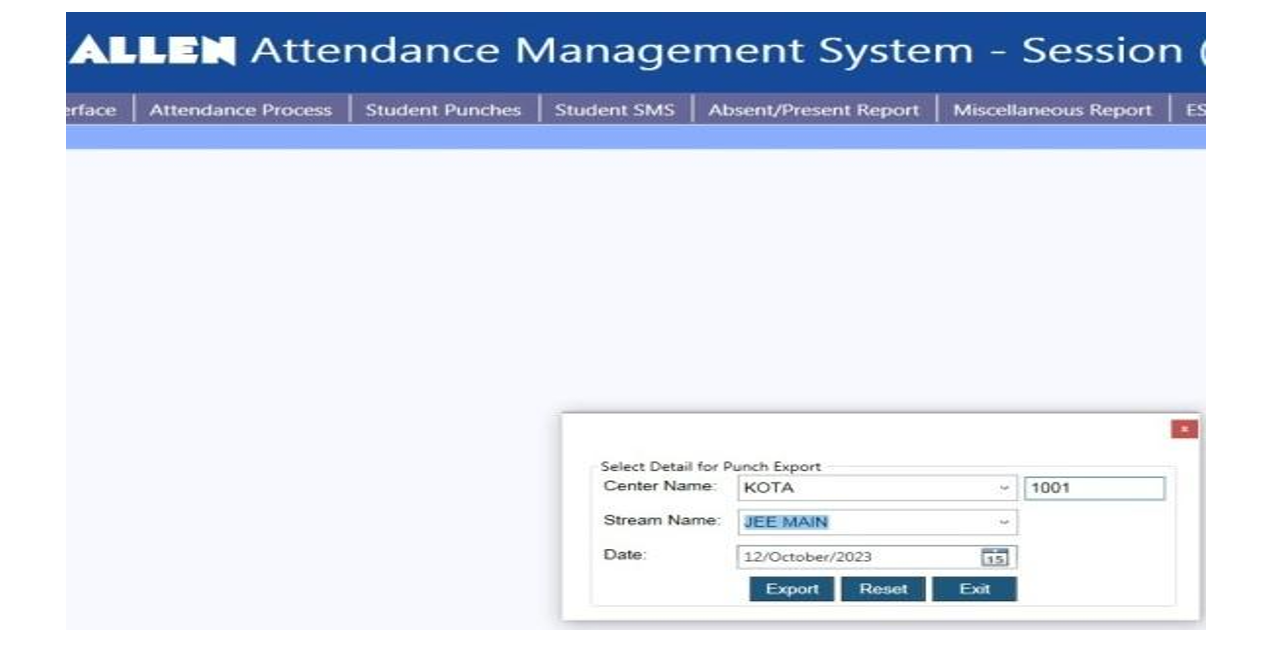
This option enables users to download a detailed report displaying the total number of scans for a specific stream.
To download this report:
This option allows users to download reports for scans that have not been processed.
To download this report:

These functionalities enhance the system’s efficiency in monitoring and managing student attendance data.
4.7. Student SMS:
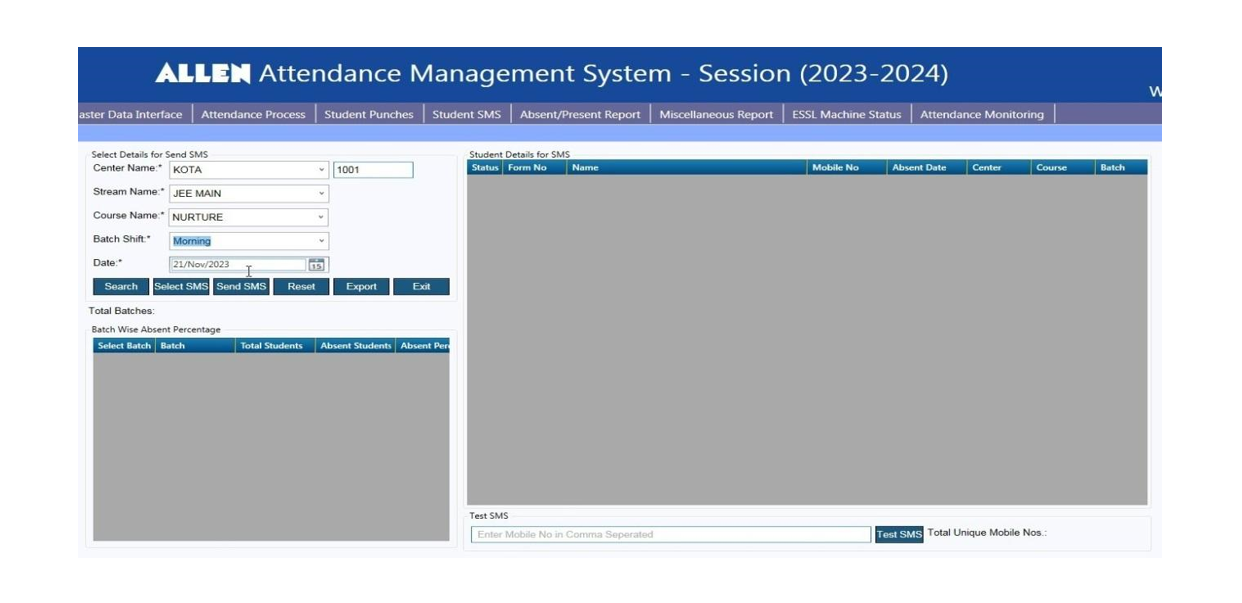
The Student SMS tab is designed to notify parents about their child’s absence in class by sending messages to their registered mobile numbers. Within this option, four distinct SMS functionalities are available, catering to different communication needs:

The Absent SMS option is used to view the reports of messages that have been sent to parents informing them about their child’s absence on the same day.
Here’s a step-by-step process to download the Absent SMS report:
a. Select SMS: This option allows users to select specific SMS messages from the report for further actions, such as sending reminders or marking attendance.
b. Send SMS: Users can use this option to send SMS messages directly to parents regarding their child’s absence or any other relevant information.
c. Export: Clicking on this option enables users to download the entire SMS data report in a format, such as a spreadsheet or PDF, for further analysis or record-keeping.
d. Reset: If users want to start a new search or clear the current input details, they can use the Reset option to reset the form and begin afresh.
e. Exit: Selecting this option allows users to exit or close the Absent SMS feature and return to the main menu or previous screen.
Follow these steps to efficiently download the Absent SMS report with the required information.
The “Stop Absent SMS and Call” tab enables the discontinuation of absent calls and SMS notifications based on specific statuses, such as illness, self-study, or critical conditions. Prior confirmation from parents is necessary before halting SMS and calls.
This option consists of two options:

Used to enter details of absent calls and SMS, including reasons, duration, and parental confirmation.
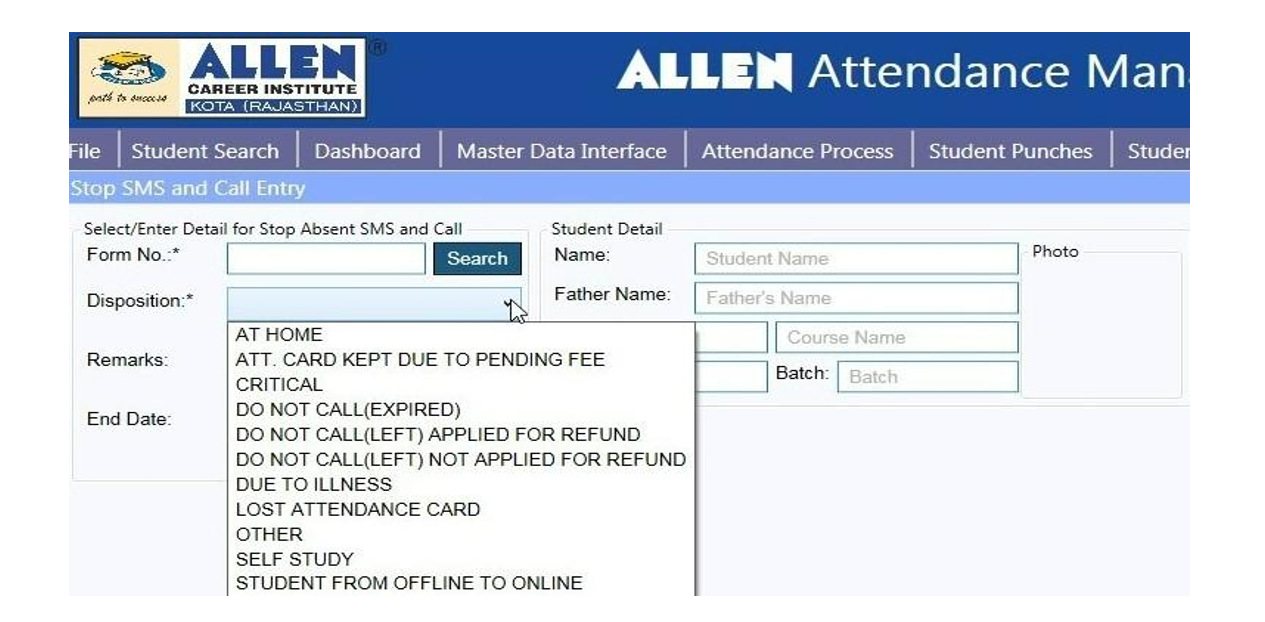
This feature is used to access a comprehensive data report of stopped SMS and calls, providing details such as reason, duration, and confirmation status.

The “Send Continue Absent SMS” option is used to send regular SMS to inform parents about their child’s consistent absence. Additionally, it enables users to view the report of sent messages as well as pending messages.
Process: Users input details such as Center Name, Stream Name, Course Name, Total Absent Days, and Test SMS. The search option retrieves SMS data, displaying status, batches, absent count, mobile numbers, etc.
Additional options include:

4.8. Absent/Present Report:
The Absent/Present Report option provides a comprehensive view of student attendance, showcasing the total present and absent records. This data can be analyzed batch-wise and stream-wise. Three types of reports are available within this option:
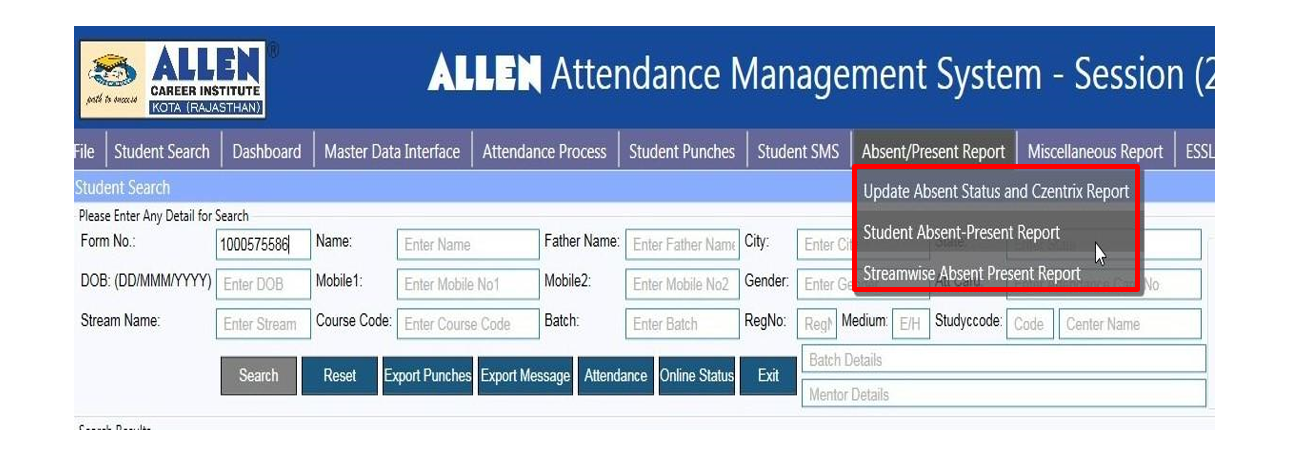
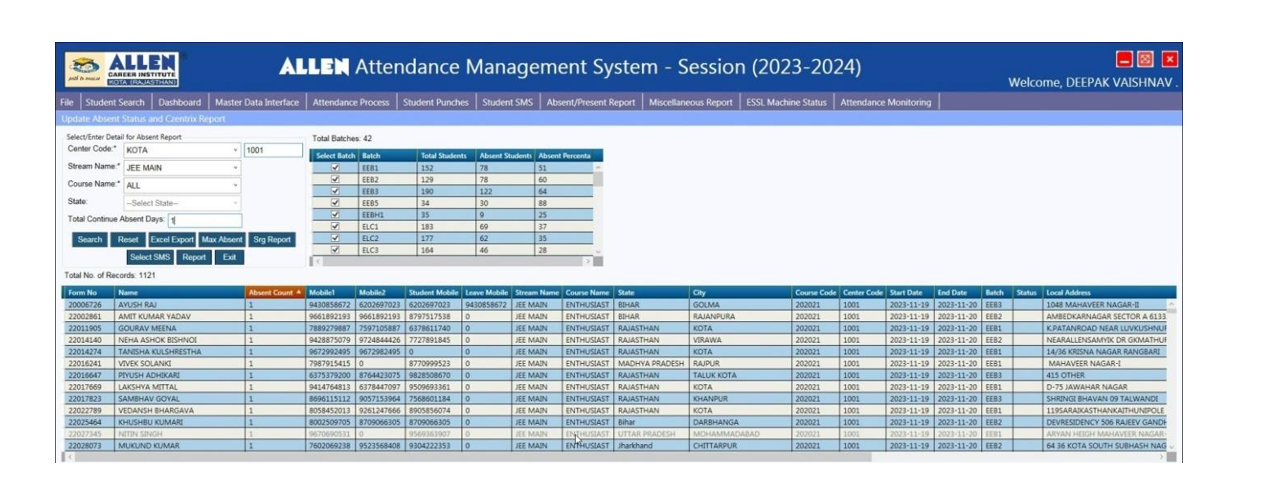
The Update Absent Status and C-Zentrix Report options allow users to view the total number of students in each batch, track daily absenteeism, and review absent calls received by agents from C-Zentrix. This includes details such as the reason for absence, communication status with parents or students, and agent information.
Process: Users input Center Code, Stream Name, Course Name, State, Total Continue Absent Days, etc. The search option retrieves data, displaying the days of absence, the total number of students in the batch, and the count of absent students.
Additional options include:
The Student Absent-Present Report option allows for filtered reports to view student absentee data in various ways. It includes multiple report types such as Absent List for Notice Board, Absent List with Contact Number, Batch-wise Absent, Batch-wise Present, Cumulative Percentage-Based Attendance Report, Form Number-wise Present Report, and Student Absent-Present Report.
 Process: Users select the desired report type and input relevant details, such as Study Code, Stream, Course Name, From Date to Date, Total Absent – Number of Days, etc. The report button generates the absentee count report in the chosen format.


The Stream Wise Absent Present Report option allows users to view the total absent and present report of students across all courses in a specific stream.
Process: Users input details such as Center Name, Stream Name, From Date To Date, etc. The search option retrieves the absent-present report for the specified stream.

4.9. Miscellaneous Report
The Miscellaneous Report feature allows access of various reports. This includes:

The Multiple Student Report option enables the viewing of diverse data reports across multiple centers. The process involves selecting centers on the left side, specifying criteria such as Center Code, Stream Name, and Course Name, and choosing a report type from the drop-down menu. Set the date range (From Date to Date), then initiate the search to retrieve the desired data report.

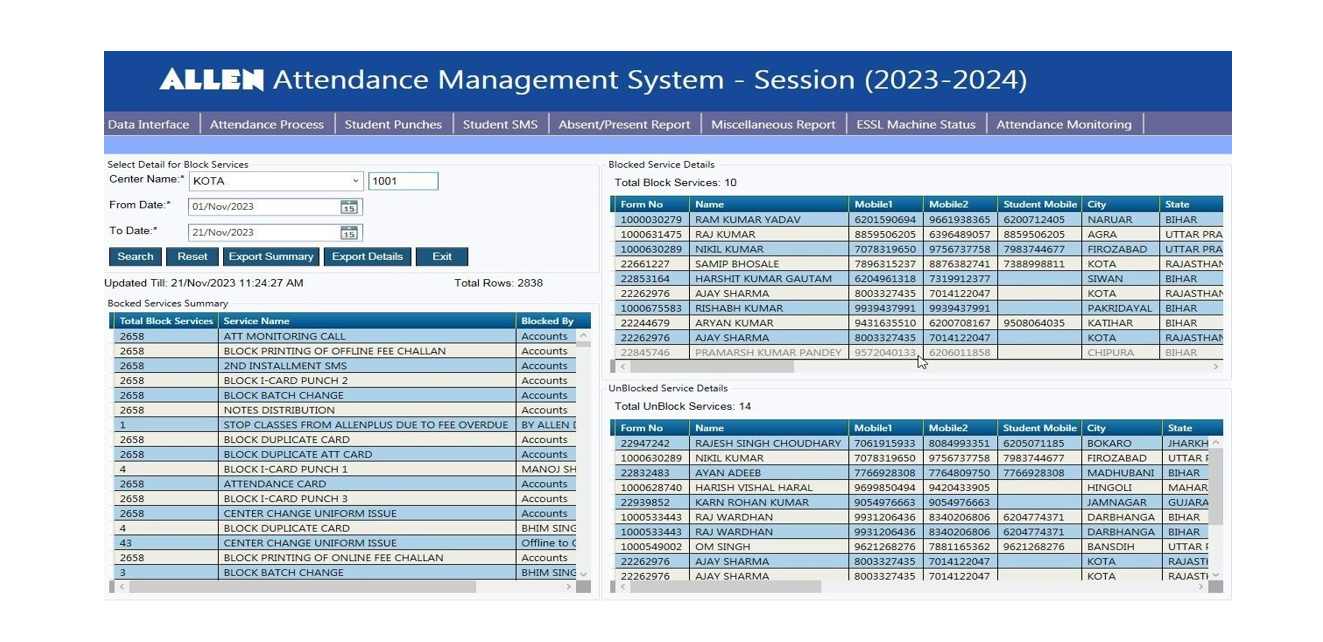
The Block Service Report option allows users to review data related to services that have been halted for students, identifying the authoritative person, date of action, and reason. Users can also track unblocked services post-fulfillment of conditions. To access the report, input Center Name, From Date, and To Date, then employ the search function to generate the updated data report.
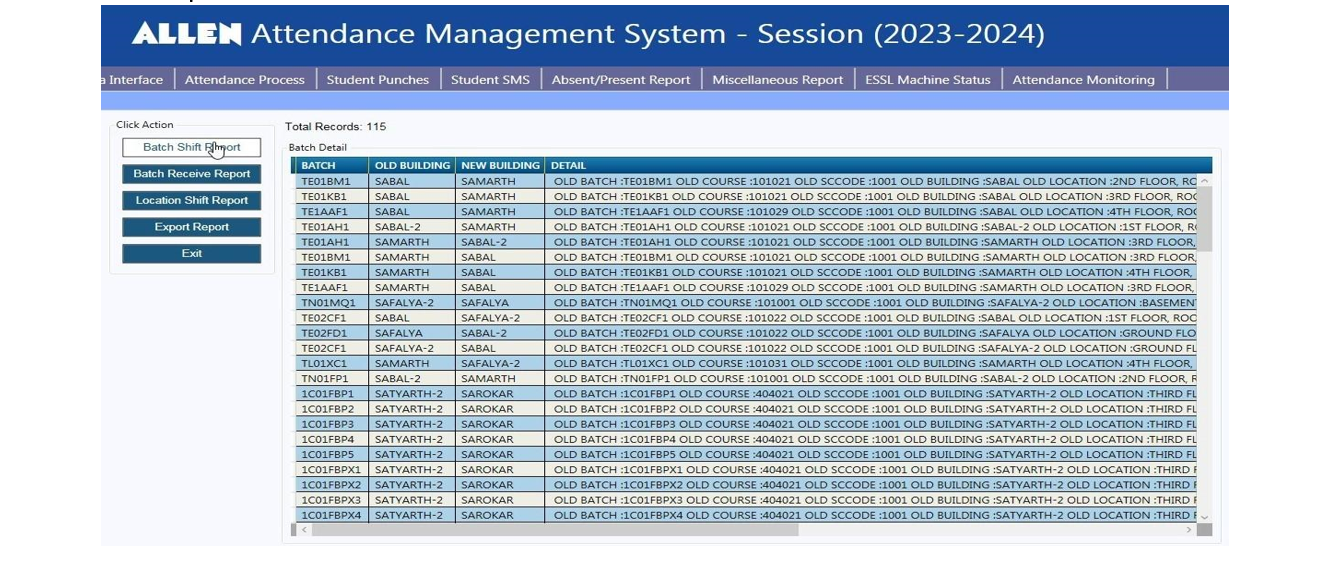
Within the Batch Report option, the Batch Shifting subsection facilitates the examination of batch transitions. This includes changes in location, building shifts, and related details. Upon selecting Batch Shifting, users can choose from report types such as Batch Shifting Report, Batch Receive Report, Location Shift Report, or Export Report, leading to a comprehensive data report.
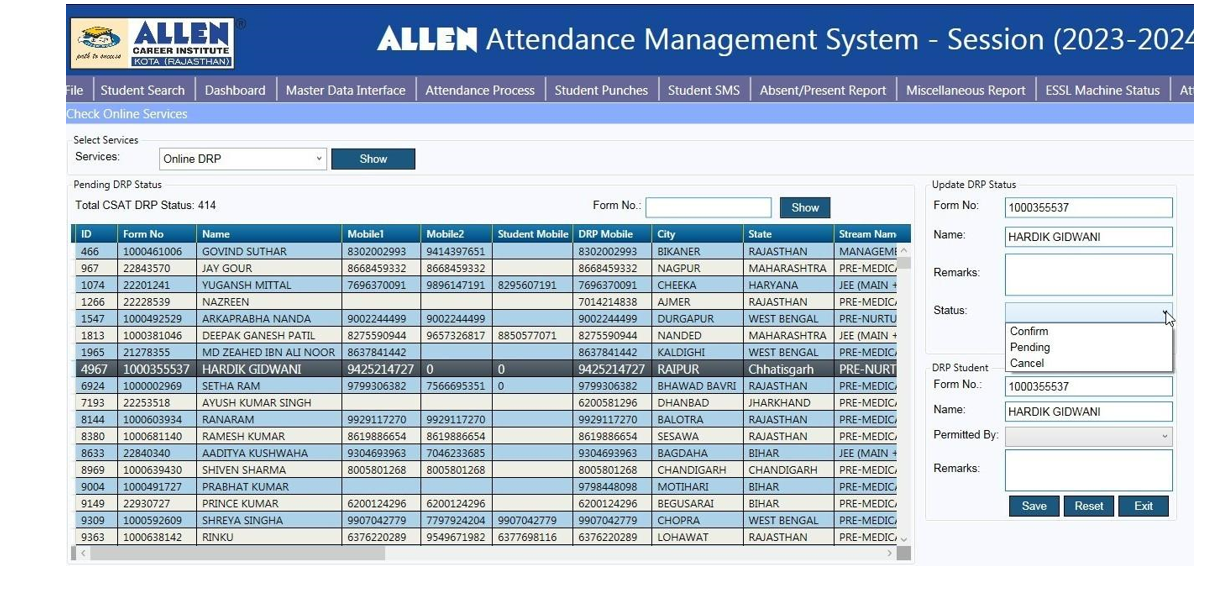
The Check Online Services option is employed to scrutinize data submitted by students through online platforms, such as Online Leave and Online Study Drop (Online DRP). Users can access detailed information regarding the reason for leave or study drop, along with the status report of the agent who confirmed with parents. By selecting the service type (online drop or online leave), users can view and update the data report accordingly.
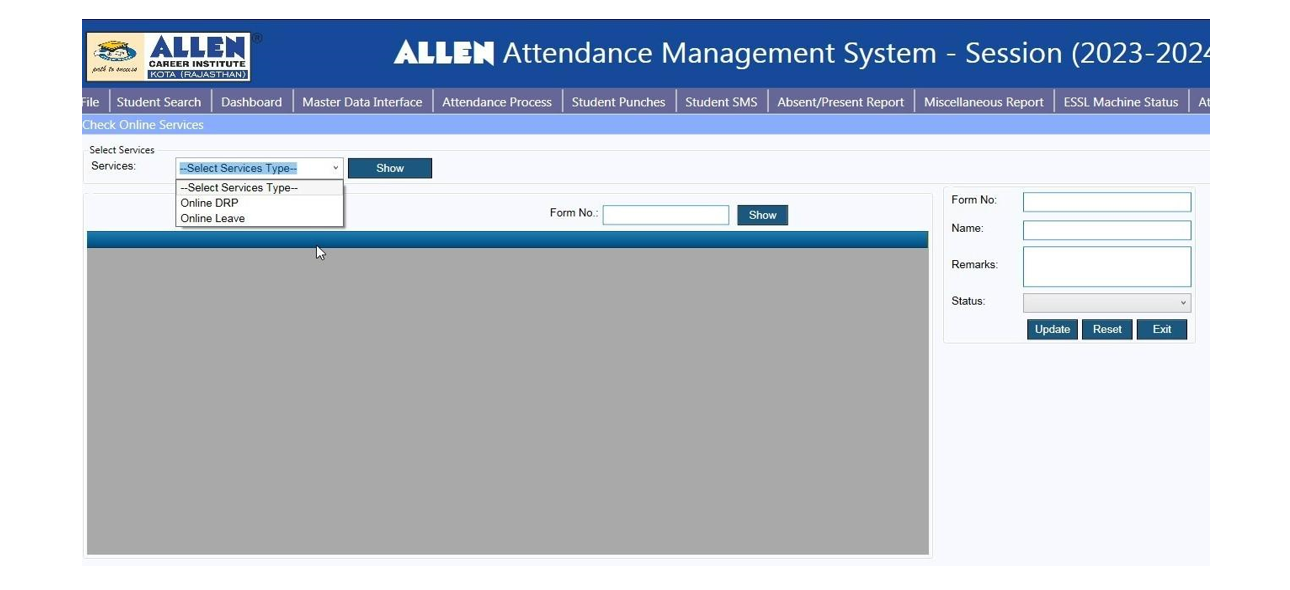
Online DRP: Upon clicking on the Study Drop Online option, users can update the status by filling in details such as form number, name, and remark, and selecting from drop-down options. The data is then saved and updated.
Online Leave: Users can review the total leave status by selecting the Online Leave option and clicking Show. The leave status, including updates post-conversations with parents, can be modified by filling in the form number, name, remark, and status, followed by saving the changes.

4.10. ESSL Machine Status:
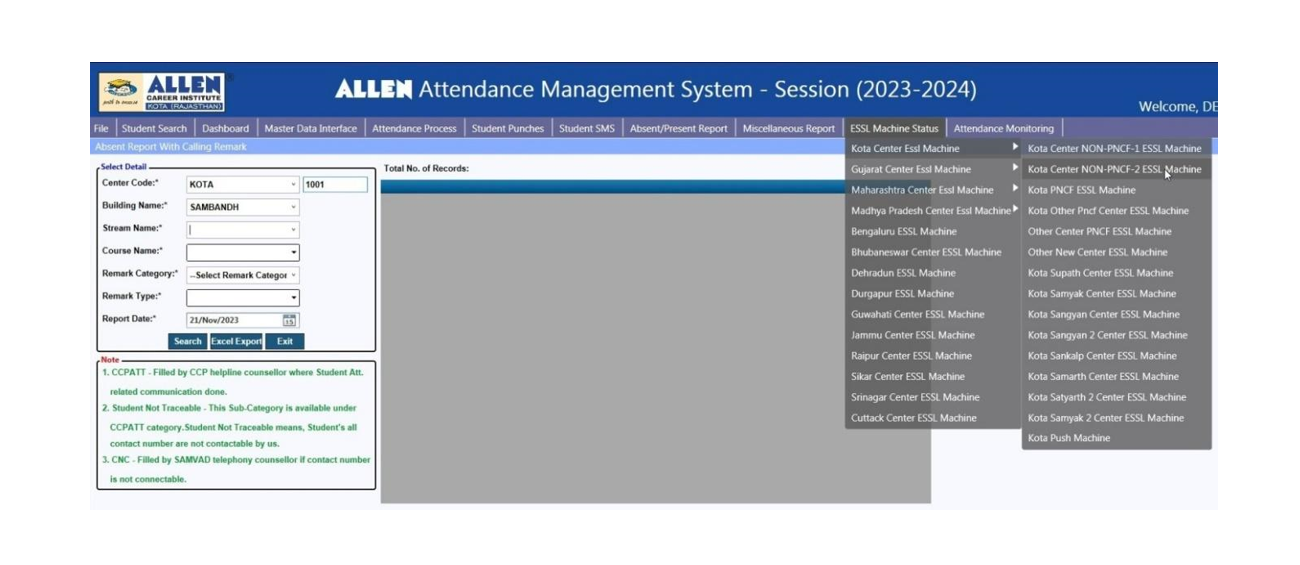
The ESSL machine status feature pertains to the RFID reader machines deployed by ESSL, a company, in each building across our centers, outside every classroom. These machines read the RFID cards (attendance cards) of students. The RFID reader machine status option allows us to check whether each machine is operational, powered off, or functioning correctly. It verifies whether the punch is visible when a student swipes their card on the RFID machine, enabling us to view a comprehensive report. This feature facilitates the examination of the RFID reader machine status for any center.
Process: Upon selecting the ESSL Machine Status option, a dropdown list of center names appears. To check the machine status of a specific center, click on its name. Subsequently, a dropdown list displaying all building names within that center appears. Choose the building name to check the machine’s status. Once selected, various options such as Center Code, Building Name, Stream Name, Course Name, Remark Category, Remark Type, Report Date, etc., become available. After filling in these details, the machine status report can be viewed using the search option.

4.11. Attendance Monitoring:
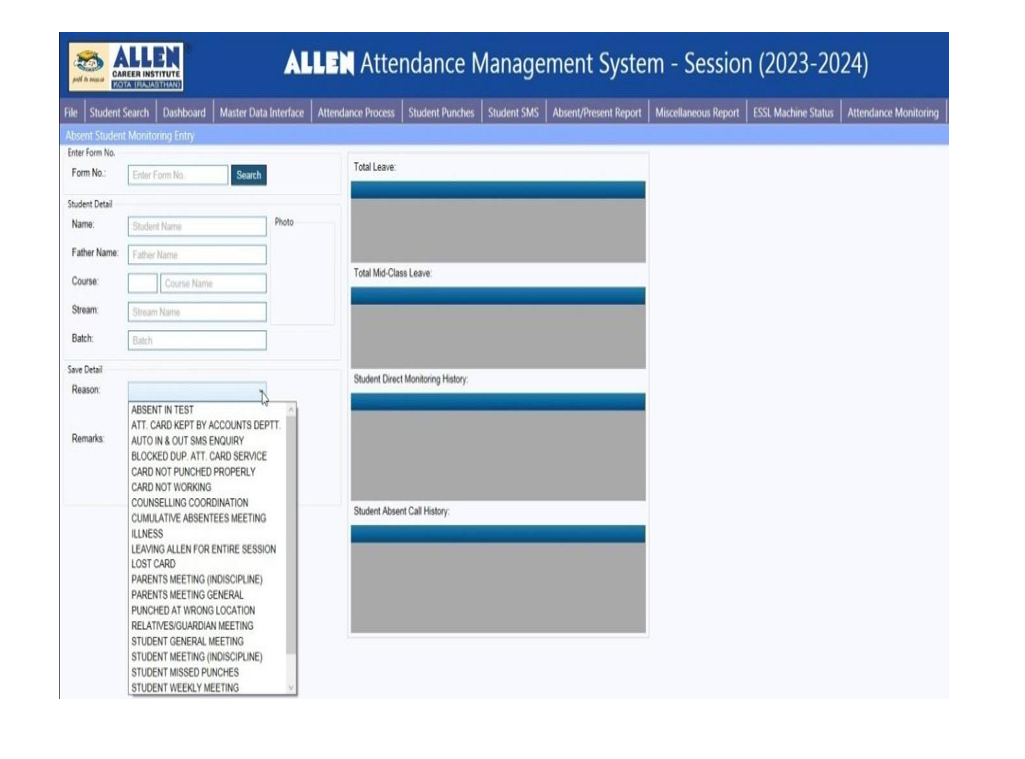
The attendance monitoring option is utilized by personnel in the attendance monitoring cell. It enables tracking student details and interactions at the attendance monitoring cell across regions. The complete report includes information on the number of students visiting each monitoring cell and the nature of their interactions.
Process: Clicking on the attendance monitoring option initiates a form number input. After entering the student’s form number and clicking the search button, details such as name, father’s name, course, stream, batch, reason, remark, etc., are displayed. Additional information, such as comments, can be entered, and the data is saved using the save button by the monitoring cell personnel. These details are then accessible on the management system panel, as illustrated in Figure 45.
Building management plays a pivotal role in the student management process, overseeing a range of administrative tasks with precision and care. Let’s delve into the enhanced overview of software panel functions and building management responsibilities:
Responsibility: Updating Batch Closure Status (Class Cancellation)
The responsibility of updating batch closure status, or class cancellation, falls under the purview of building management. Streamlining this process involves several strategic steps. Administrators access the interface and select the batch closure option. They then input details such as the center name, stream name, and course code.
An important aspect is the ability to specify the period of batch closure, reasons for cancellation, and consequential updates on the list view. This view displays essential information including active status, course code, batch name, reason, and closure date.
Procedure:

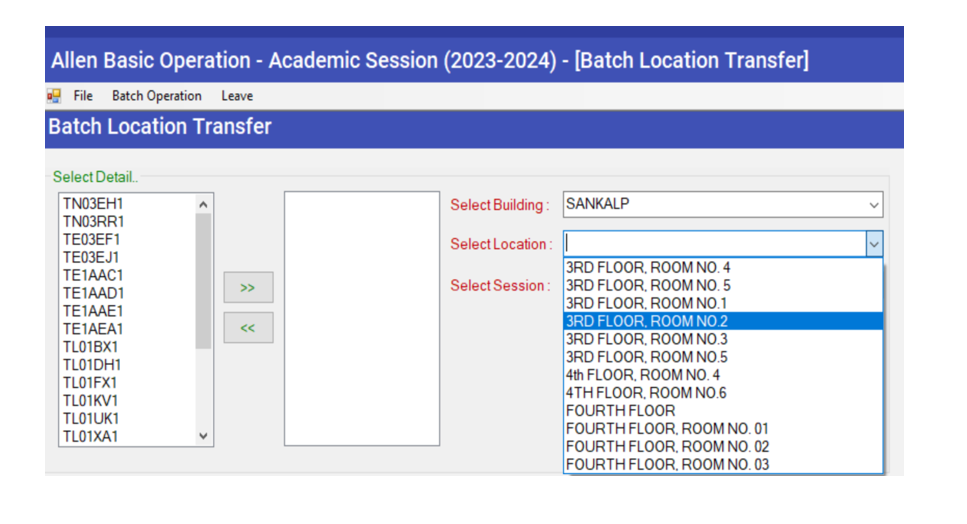
Responsibility: Exclusive authority to relocate batches between the buildings.
Empowered by their personalized panel, the building management executes batch relocation with precision, including batch timing adjustments. Within this specialized panel, a visual representation of available batches is presented. The seamless shifting process involves selecting the shifted batch, designating the new building location, and confirming the operation. Subsequently, the General Enquiry Section is updated with pertinent data.
Procedure:

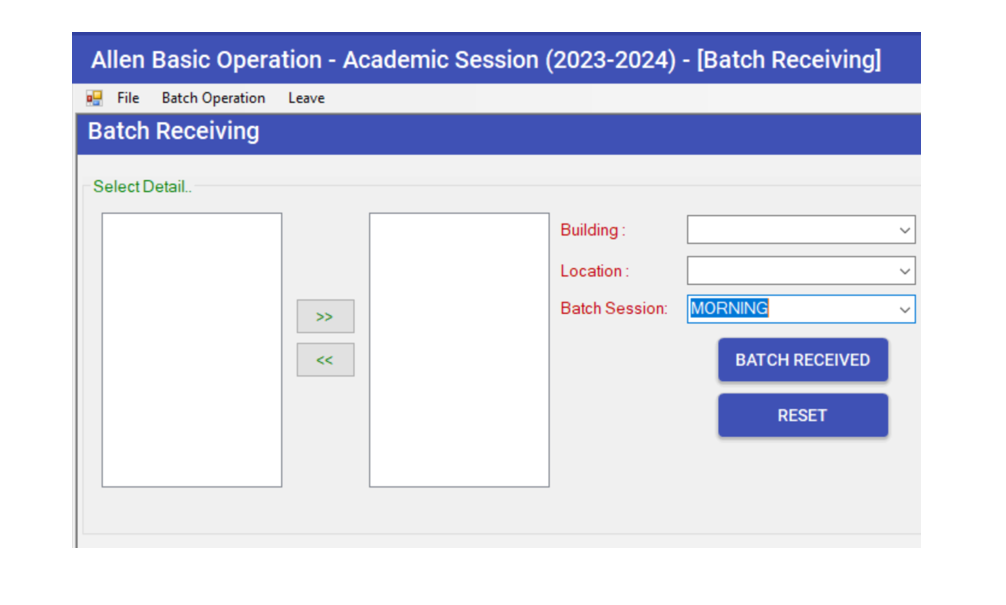
Responsibility: Transferring batches between buildings with mutual consent of respective building management.
Transferring batches from one building to another requires coordinated efforts from both sending and receiving building authorities. Utilizing the batch-receiving option, administrators can complete the handover process seamlessly. After selecting the shifted batch and providing the necessary details such as building, location, and session, the updated data is synchronized in the General Enquiry Section.
Procedure:
Responsibility: Coordinated relocation of batches within the building floor.
Facilitating batch relocation within the building floor is a task orchestrated by the designated building management. Using the personalized panel for Basic Operations, administrators can efficiently transfer batches, updating the General Enquiry Section with accurate information.
Procedure:
Responsibility: Direct the students to the admission desk under face recognition circumstances.
In the event of a face recognition issue, the building management takes responsibility by directing the student to the admission desk for assistance. The admission desk staff will provide the necessary support to resolve the student’s face recognition problem.
Procedure:
Responsibility: Authorizing the blocking and unblocking of services for students.
In cases of misuse or failure to settle fees, the building management has the authority to block services. Using the Block Service Option, administrators initiate the process by entering essential details, subsequently reinstating services such as face recognition.
In effect, the software panel serves as a dynamic hub, empowering the building management to orchestrate and monitor these critical operations.
Procedure:
